I hope you are all doing well! Today is a short and sweet blog post. Today you’ll view a video of how i store the reference of the embossing folders that I own.
I used scraps of card stock from my collection and cut them down to basically 4″ x 6″. Then I used scraps of paper from my scrapbooking collection to make the covers. I used a cinch machine to punch the holes for the binding and a 1″ coil wire for the binding of the books.
I also printed out “embossing folders” title from a lightweight white card stock. The font is called Lily One and it is a google font you can download for free. Just do a google search for it, and I’m sure you will easily find it.
Here is a video slide show of the Craft Club meeting on March 30, 2019
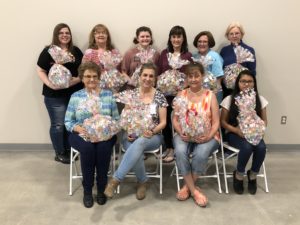
Our wonderful group of crafters!
Special thanks to Julia, Judy, Lelani, and Sharon for their help in preparing materials. If you would like to help prep materials, please email me, all materials (including the loan of dies, stamps, and a die cutting machine) will be provided. Pictured below: Julia, Loretta and Lelani — complete with rabbit ears provided by sweet Lelani.
Julia is our craft club vice president. Thank you for your willingness to serve our group and community!
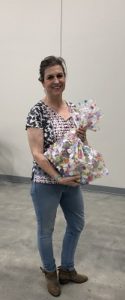
Bobbie, Sara Elizabeth (SEC) Jay, Loretta, Julia and Jill — The final packaging of this months 90 projects.
Cove Crafters
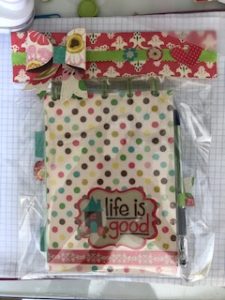
Today, eleven members of the Cove Crafters (Shepherd’s Cove Hospice), met in the new Shepherd’s Cove Thrift Shoppe to assemble Easter-themed gift baskets for our patients. We produced 90 of these adorable Easter projects, which will be distributed to our patients starting April 1, 2019. Each basket contained three hand made elements, One large pinwheel, one small notebook (with a pinwheel on the cover) and a chocolate bunny treat.
Each gift also had a small handmade card matching the spring and Easter theme.
Someone asked me today how much time I typically spend preparing for the monthly craft meetings, which usually run only 3-4 hours. The fact is, it requires about 80-120 hours of preparation on my part, as well as additional helping hands, to gather materials & hand-craft all the individual parts and pieces that go into each project. The goal is to have each project ready to be individually assembled by our Craft Cove volunteers at the monthly meetings.
As president of the Cove Crafters group, I happily facilitate each monthly project. It is such a blessing to be part of this community.
One of the most important lessons I have learned is not only humility, but the importance of seeking out and graciously receiving help. In this case, the words “It takes a community…” rings true. I couldn’t do this by myself. With the help of the Cove Crafters wonderful volunteers, the blessings we may give to our hospice patients and their families are returned to each of us a thousand-fold.
If you would like more information on supporting Cove Crafters, please send me an email to: Ms.Rhetta@gmail.com. Please put “Cove Crafters” in the Subject line so that I will not mistake your email for spam.
Colossians 3:23-24
“Whatever you do, work heartily, as for the Lord and not for men, knowing that from the Lord you will receive the inheritance as your reward. You are serving the Lord Christ.”
It is an easy project for craft clubs, fairs and gifts. Entire project actually took about 22-30 min. However I do want to note, if you do all the prep ahead of time and assembly line style put things together the process is very easy.
The best advise I can offer with this project is patience. I suggest, just clean off your work surface, prep and get things done. I plan to charge $10-14 each for these.
Ask questions in the comment section or email me at Ms.Rhetta@gmail.com
In today’s post I will show you how to make this adorable modified slider card. For the slider mechanism you can purchase the die from My favorite things stamps here.
I used two pennies and a pop dot from my collection. To enable the sliding mechanism to move smoothly, i used baby powder I purchased from my big box store and applied it with a paint brush. If the image wants to flip entirely, you may want to add some more pop dots, simply place them on the sides and middle of the back on the image and remove the stickiness from the pop dot back so it slides across the card easily.
These cards can be time consuming, but are well worth the effort. If you have any questions, please email me directly at Ms.Rhetta@gmail.com. Please put the name of today’s project in the subject line so I will not disregard your email as spam.
Have a super day, stamp happy and be a blessing! Until next time!