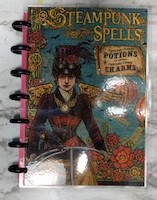
The Happy Planner – DIY Cover

For making this cover you will need your choice of scrapbook paper I used this steam punk spells paper from Graphic 45.
The laminating pocket were purchased from Scotch 3M, click here. I used binding discs bought from the Disc bound marketplace.
Please let these folks know I recommended their website to you in the comment section of your order. They have fabulous customer service and the quality of their product along with their pricing are instrumental in my decision to buy my disc from them.
I found this planner quick reference from the all about planners website, you can view it by clicking here.
For a similar lamination machine to the one I used, I suggest the one from Scotch as well, it is reasonably priced and is a work horse in my craft room. Click here to purchase.
Before beginning, be sure to measure your covers. Measure the actual size of the paper and the size of the cover including the lamination. Cut your paper down to size. I used the Cutterpillar Crop. To purchase one for yourself click here.
Once your covers are cut, put them into the laminating pouches and put them through the machine following the manufacture directions. I send mine through several times to be sure the materials are completely sealed.
This does not take long. Cut a scrap of paper and measure to the size of your covers. Using your happy planner punch , do a test punch and fitting before punching the covers and/or dashboards. Make sure you have the covers in the correct orientation before punching so that your covers are right side up and the correct view is facing outwards.
For a chance to win this set of mini happy planner covers, leave a comment on the YouTube Video or on this post. A winner will be drawn on October 20, 2019 and this is open to everyone. If you have any questions, please leave them in the comments section or the YouTube video which you can view by clicking here.
*Affiliate links are used when available at no additional cost to you. These links enable me to continue my personal ministries. *
Have a great week, stamp happy and be a blessing until next time!