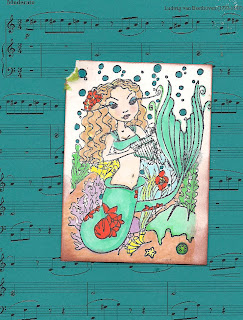
Emily and her flute! Queen Kat Tuesday!
Image for shrink plastic pieces, please see instructions:
Hello friends!
It is time for a beautiful Queen Kat image, meet Emily and her flute, I want to call it her “magic” flute because she can certainly soothe the most troubled waters with her beautiful music.
For today’s projects, you will need to gather up the following:
Emily stamp set,
Shrink Plastic,
Copic Markers
and your imagination!
To begin: Stamp image onto white card stock and color as desired with copic markers.
Layer her onto an orange base that has been sponged with black ink, print out sheet music (from 8notes.com) onto teal card stock and trim to size 5 1/4″ X 4″. Sponge the edges of this pieces, attach flower and tape as shown.
I stamped “The magic of Love” on the inside of the card. This would also make a beautiful engagement notice card.
For the pin, I stamped the image and colored it (you can also do this with the image you already colored) and place it on top of a piece of musical score you’ve printed out. Place this piece underneath the stamp image and scan into your computer. Using my editing program, I chose to print out the image four times onto Shrink plastic. I printed the image onto the rough side of the plastic.
After the image was printed, I allowed it to dry on my desk for about 1/2 an hour. I then trimmed out each individual image using my heavy duty scissors. If desired you can put a hole in the top center to use as a charm, earrings or embellishment on a card or scrapbook layout.
Following the manufactures instructions, I used a heat gun and shrunk the image. I did use a silicone craft mat under the image, then once it was shrank, I used my Glossy accents (inkessentials) to cover the image. While it was still cloudy and wet, I used dew drops and small glass beads to enhance the already beautiful piece. Along the outside edges I used studio G glitter glue. The piece was set aside to dry for about 2 hours. (If you’ve had a long day like me, this is a good time to give yourself permission to take a nap!).
After your nap, the image will be completely dry, and you will feel better! Now onto the next step. Using a pin back from your local craft store, attach this to the back of the piece using a dab of hot glue, please be careful not to burn your fingers. With all craft projects you should follow manufacturer’s instructions and use reasonable caution so you will not injure yourself or burn down your house.
Here is the Queen Kat stamp store. Go ahead do some shopping, you deserve some fun stamps! The many artist lines, stamp sets and just plain fun stuff is to be seen and purchased here. I hope you will enjoy these projects and give them a try.
Stamp Happy and be a blessing.


